What is UI Testing and Why it is so important?
Here, we want to talk about one of the most effective tests in our automated testing arsenal: the (User Interface) UI testing.
What is a User Interface?
User Interface is the visual part of a software application that obviously determines how a user interacts with an application, or a website, and how information is displayed on the screen.
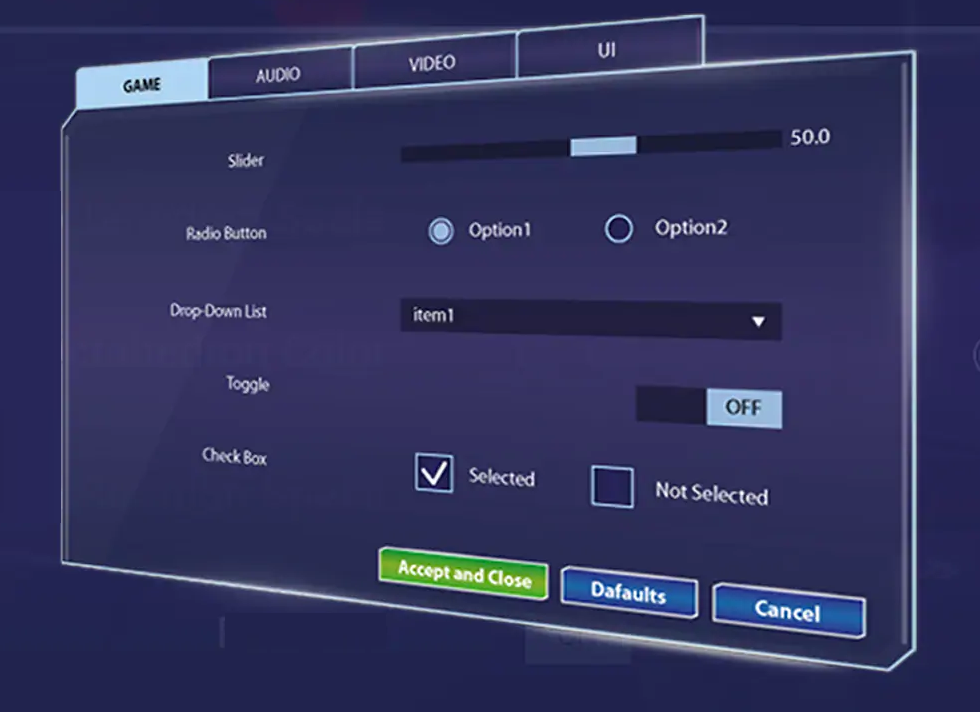
Of course, UI contains, for example, buttons, menus, text fields and all other controls those users interact with when using an application (Fig. 1).
What is UI Testing?
Therefore, UI tests are scripts that verify an application as the end-user would.
Indeed they mimic actions, such as clicking on a control, entering text, scrolling a page and so on, by also checking that the software does what it should of course.
So, UI tests are so powerful because they go end to end, from the UI layer down.
End-to-end means testing all the different parts of an application from the beginning (the user interface) to the end (the underlying services, the database connectivity, etc.).
Briefly, what makes UI tests so good is that they walk through all the layers of the application being tested, ensuring for key application workflows that everything is indeed hooked up and behaves as expected.
UI Testing Weakness
On the other hand, the weakness of UI tests is that they tend to be slow and fragile.
Generally, those tests are slower (e.g. respect to unit tests) because they go through more layers of the application-under-test.
Moreover, they could be fragile if they are tightly coupled to the user interface: in this case, even a little UI change, or functionality, can break one or more tests.
How to design UI Testing
Now, let’s look at a login application for our example (Fig. 2), and how to deal with the UI Testing weakness.
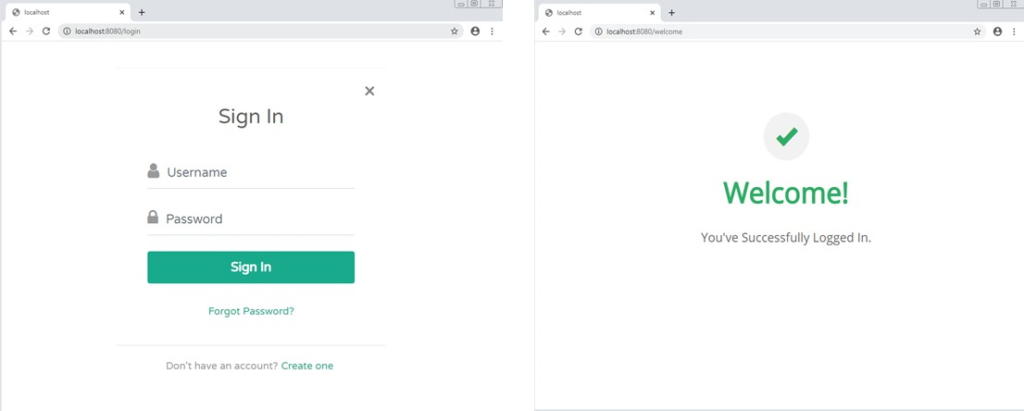
First, to start writing our first UI test, we should think about what a user would do to log into the system.
So, we would have to navigate to the login page. Once there, we would enter our username and password. Next, by clicking the Sign-In button, we would log in to the system. Eventually, we want to verify if we were redirected to the welcome page.
The test case will result in the following steps:
1. navigate to the login page,
2. enter a username,
3. then enter password,
4. click the sign-in button,
5. and check for the presence of ‘Welcome!’
The Java Example
Once the test case is ready, we can simply convert it into a test “script”:
                public void loginTest() throws Exception {
                       Bootstrap.startApplication("Chrome");
                       new GuiBrowser().navigateTo("https://localhost:8080/login");
                       GuiText username = new GuiText("Username");
                       username.setText("maveryx");
                       GuiPasswordText password = new GuiPasswordText("Password");
                       password.setText("N6$J#3ug");

                       GuiButton ok = new GuiButton("Sign In");
                       ok.click();

                       GuiHtmlElement message = new GuiHtmlElement(AccessibleRoleMaveryx.WEB_H1);
                       assertEquals("Welcome!", message.getText());
                }
Finally, here is our first automated test!
It is written in Java using the Maveryx framework. In case of UI changes, the test won’t need any reviews. This characteristic of Maveryx, let you create tests without worrying about the UI Testing weakness.
Let’s walk through the test script.
1.	        Bootstrap.startApplication("Chrome");
2.	        new GuiBrowser().navigateTo("https://localhost:8080/login");
The above two lines launch the browser (1) and then visit the login page by navigating to the URL of the login page(2).
Once there, obviously we have to enter our (valid) credentials.
1.              GuiText username = new GuiText("Username");
                username.setText("maveryx");

2.              GuiPasswordText password = new GuiPasswordText("Password");
                password.setText("N6$J#3ug");

3.              GuiButton ok = new GuiButton("Sign In");
                ok.click();
These three blocks fill username (1) and password (2) into, of course, their respective text boxes and then click the sign-in button (3).
After, there is just one line to check if we got correctly redirected to the welcome page as expected. Now, we can be sure that we have if we can find an HTML H1 header containing the text “Welcome!”.
                GuiHtmlElement message = new GuiHtmlElement(AccessibleRoleMaveryx.WEB_H1);
                assertEquals("Welcome!", message.getText());
Assertions (like assertEquals) are truths about our software we may want to check. In this case, we expect that the head element has the value “Welcome!”.
Conclusions
Congratulations! You are just walked through your first UI test. Well done!
This UI test is a good example of end-to-end testing.
With this script, we’ve tested at some basic level, in a valid real user scenario (Fig. 3):
1. of course the login user interface,
2. but also the authentication service
3. and the database access (& “data integrity”)
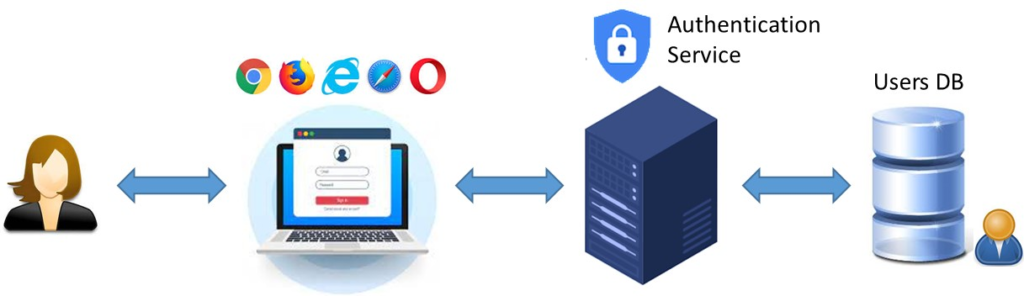
It shows how UI tests slice through all the layers of an application. For this reason, they are important for testing key application flows, such as creating or logging into an account, or adding items to a cart and checking out, etc., to ensure all software pieces work together as expected.
Creating UI tests for these flows, let you validate that your software is functional at every level, by identifying broken functionality early before customers do.