
We generally use to consider Functional UI Testing the most critical type of testing because, first of all, an application must do WHAT it is supposed to do. And indeed, functional testing verifies that an application works as expected through its user interface.
Or, if you prefer, according to Glenford Myers, Functional UI testing means verifying the software through its UI, of course, with the intent of finding errors (i.e., “find discrepancies” between the program and its specification).
Given these points, Functional UI testing verifies, from the end user’s perspective (through the user interface), that the software behaves according to its functional requirements specification without knowing the internal logic and implementation (black-box). In simple words, Functional UI testing verifies an application in the same way an end-user would.
Also, Functional UI tests are effective because they go “end-to-end” from the UI layer. In effect, end-to-end means testing all the different parts of an application from the beginning (the user interface) to the end (the underlying services, the database connectivity, etc.).
Automated Functional UI Testing
From the automation point of view, Functional UI tests imitate users’ actions such as clicking on a control, entering text, scrolling a page, and so on by also comparing the actual outputs with the expected outcomes.
With this in mind, in automated Functional UI scripts, working with user interface elements, a tester should always use this pattern:
- IDENTIFY: locating the elements to use
- ACT: performing the requested (test) actions
- CHECK: comparing expected results vs. actual results
In fact, this pattern recurs continuously in an automated test script.
The I-A-C pattern in Functional UI Testing
In an automated Functional UI script, each test’s “step” consists of two parts: first, an “action” and then a “checkpoint.”
Of course, an “action” is an interaction between the test tool and the UI object-to-test. An example of action is clicking a button or entering a text into a text field.
Clearly, an action consists of a “target”, a UI object-to-test, and a “command”, a test action to perform (e.g. ‘click’, ‘type’, …). In particular, a command may have inputs (e.g., type “some text”) or not (e.g., click).
On the other hand, a “checkpoint” compares the actual outcome from the Application Under Test and the expected one. For example, the predicted result could be that typed text is in the text field.
Hence, in writing an automated Functional UI script, a tester shall:
- (uniquely) IDENTIFY the UI object-to-test
- set the test ACTion to perform
- CHECK that expected results and actual results match
All this is what we call the I-A-C pattern.
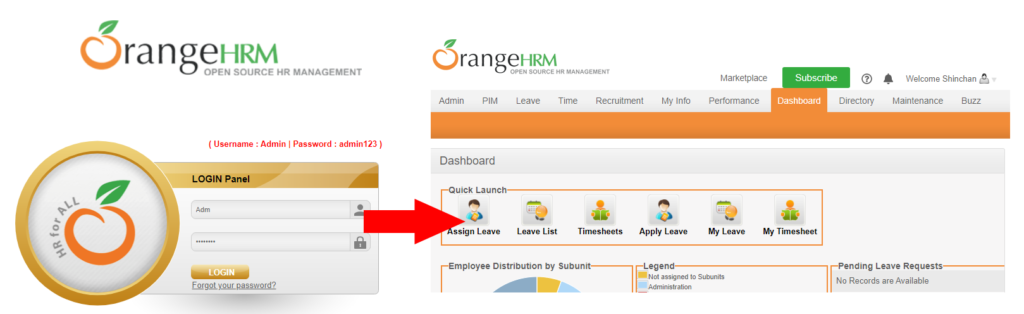
For this article, we will use the login system of the OrangeHRM demo software at https://opensource-demo.orangehrmlive.com/ (Figure 1).
Functional UI Testing: Test design
First of all, let’s start designing the test case.
For instance, on a login system, a tester wants to insert valid credentials (username and password), and after clicking on the login button, she automatically wants to log in.
Schematically:
- Enter valid username
- Type valid password
- Click login button
- Check user is successfully logged in
Let’s automate this test case by using the I-A-C pattern.
IDENTIFY the UI object-to-tests
The first step is to locate the test objects.
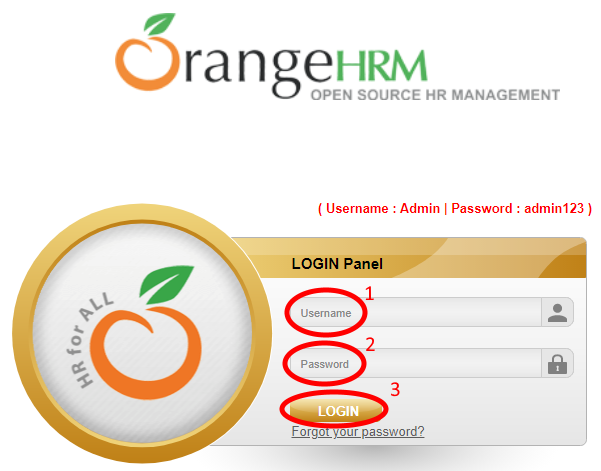
So, in the OrangeHRM login test case (Figure 2):
- username text field
- password text field
- login button
Selenium and Selenium-based tools use “Locators.” Basically, a locator enables testers to identify the web element to interact with.
Selenium offers several different methods like, for instance, className, cssSelector, id, name, XPath, etc.
WebElement usrName = driver.findElement(By.id("txtUsername"));
WebElement password = driver.findElement(By.name("txtPassword"));
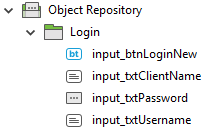
WebElement login = driver.findElement(By.xpath("/html/body/div[1]/div/div[3]/div[2]/div[2]/form/div[5]/input")); Instead, other tools use “pre-recorded” GUI Maps (or Object Repositories) to locate objects.
Here, a GUI Map represents an abstraction of the structure of the user interface. Hence, it contains the logical names and physical descriptions of the UI objects to test.
For example, a tool based on this technology reads an object’s description in the pre-recorded GUI map (Figure 3) and then looks for an object with the same properties in the tested application.
On the other hand, Maveryx does not use any locator or map: the UI elements to test can be described in the test scripts as they simply appear in the application (on-screen).
In this example, the username text field is identified by its placeholder “Username” (Figure 4).
//the Username text field
GuiText usrName = new GuiText("Username");
Furthermore, the password text field can be identified by its placeholder “Password” (Figure 5).
//the Password text field
GuiPasswordText password = new GuiPasswordText("Password");
Of course, the same applies to the login button, which can be identified by its caption “Login” (Figure 6):
//click Login button
GuiButton login = new GuiButton("LOGIN");
As a result, the test objects defined in the test script are identified directly at runtime without using any pre-recorded GUI Map.
ACT on the UI object-to-tests
Once the test objects are located, obviously, a tester wants to perform the relevant test ACTions on them, such as clicking on a widget, typing some text, selecting an item in a drop-down list, etc.
In our example, we would enter some text into the username and password fields and click on the login button.
So that, to execute these actions with Maveryx, a tester can use setText() and click() methods:
//the username
String username = "Admin";

//the Username text field
GuiText usrName = new GuiText("Username");

//set the username
usrName.setText(username);
//click Login button
GuiButton login = new GuiButton("LOGIN");
login.click();
CHECK the results
Now that the test interacts with a GUI object, it’s time to verify that the expected output is produced.
For this purpose, assertions are the best tools to verify that the expected test results match the actual results. Basically, they are assumptions on the application under test that must always be true. If any assertion fails, the test will fail. Similarly, if all assertions pass, the test will pass.
Hence, assertions help testers to quickly check if the Application Under Test behaves as expected or not.
For example, if you write a method that calculates the sum of two numbers (e.g., 3 + 5), you might assert that the sum is correct (= 8).
Each assertion contains a boolean expression that you believe will be true when executed. The experience proved that assertions are one of the quickest and most effective ways to detect and correct bugs.
There are several assertions libraries like JUnit, Hamcrest, AssertJ, etc.
For instance, JUnit provides assertEquals() and assertNotEquals() methods to compare the equality and inequality of values. So, the assertion passes when values are equal; otherwise, it fails and throws an AssertionError.
The first parameter passed to the assertEquals method corresponds to the expected value, and the second parameter is the actual value.
In functional UI testing checkpoints include:
– values checking: a string is entered, a message is displayed, a drop-down contains a list of items, a web element has a given property, etc.
– property checking: a UI object is enabled, is editable, focused, etc.
– presence checking: a UI object is present or not in the current user interface
In our example, we would check if the username and password text field contain the entered search key.
//the username
String username = "Admin";

//check that the username has been correctly inserted
assertEquals(username /* expected */, usrName.getText() /* actual */);

//the password
String pwd = "admin123";

//check that the password has been correctly inserted
assertEquals(pwd /* expected */, password.getText() /* actual */);
If we would check that the “login” button is enabled, we can use: assertTrue(login.isEnabled() /* actual status */);
We could also check the URL of the landing page after logging in.
//the Dashboard page URL
String dashboardURL = "https://opensource-demo.orangehrmlive.com/index.php/dashboard";

//check the Dashboard page URL
assertEquals(dashboardURL, new GuiBrowser().getCurrentPageUrl());
Another way to check that an application behaves correctly is to verify that a UI object is present or not.
We can also verify that the “Welcome” message popped up to check the successful login (Figure 7). For this purpose, testers can use the waitForObject() method:
//check that the "Welcome Shinchan" is present
new GuiHtmlElement("Welcome Shinchan").waitForObject(5, 1);
The waitForObject() function waits until the given object exists. It returns if successful or raises a (catchable) ObjectNotFoundException exception on failure, i.e., if the function times out and the UI object is not displayed. By this approach, you can use this method to check if an object exists (i.e., is shown) or not.
Conclusion
Functional UI testing is essential because it verifies that an application does what it is supposed to do through its user interface, as the end-user would. Also, it allows testing an application end-to-end from the start (the UI layer) to the end (services, DB, etc.).
From the automation point of view, Functional UI scripts consist of two main blocks: UI interactions and assertions.
UI interactions consist of firstly identifying the UI objects to test and then acting on them.
On the other hand, assertions allow comparing expected results from specifications to actual results from the application-under-test.
A tester should keep in mind the I-A-C pattern to write good automated Functional UI tests:
1. IDENTIFY the UI object-to-test;
2. ACTing on it;
3. CHECK that expected outcomes and actual outcomes match.
In conclusion, this pattern allows creating of more effective automated tests, ensuring maximum test flow control and at least more readable and maintainable scripts.