
Here we are going to see an easy practical example of how to test a React Application.
What is React
React (or ReactJS) is a free, open-source JavaScript library for building user interfaces based on UI components. It is maintained by Meta (Facebook) and, moreover, a community of individual developers and companies.
The library first appeared in May 2013 and is now one of the most commonly used front-end libraries for web and mobile app development.
Particularly, React allows a dynamic web page to update without complete reloading.
How it works
In React, every UI piece is a component, and, of course, each component has a state. React listens for component state changes and “reacts” to these changes by updating and rendering just the right components by reloading only parts of the page.
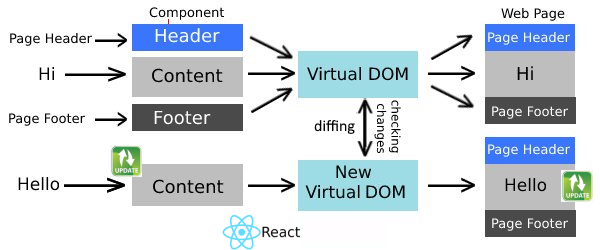
In the first place, React uses a virtual DOM-based mechanism. The virtual DOM is a virtual representation of the DOM. Accordingly, React stores a virtual copy of the current DOM. When the state of a component changes, it updates the virtual DOM. Obviously, once the virtual DOM has been updated, React compares the current version of the virtual DOM with the previous one (diffing).
Once React knows which virtual DOM objects have changed, it calculates the best possible method to make these changes to the actual DOM, then it updates (batched updating mechanism) only those objects in the real DOM (Figure 1). Generally speaking, this ensures minimal operations on the real DOM by giving the user a dynamic experience with the webpage.
The Example
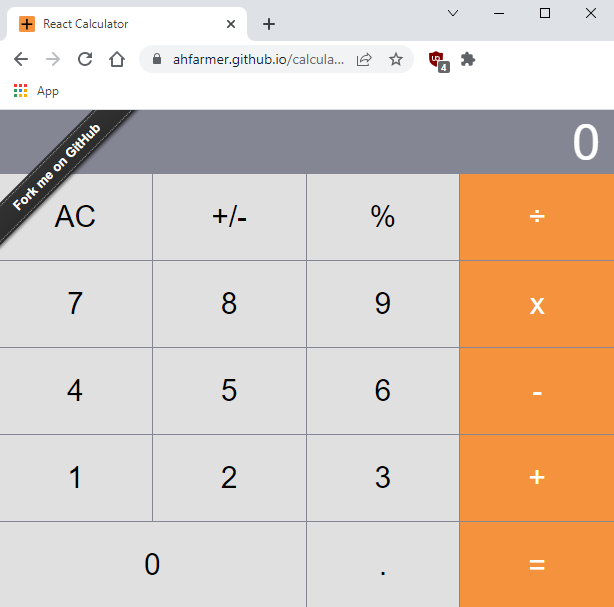
For this article, we have chosen an iOS-like calculator built in React (Figure 2). This is one of the examples available on React website (https://reactjs.org/community/examples.html).
Functional UI testing verifies that an application works as intended through its user interface.
Indeed, functional UI testing verifies, from the perspective of the end-user (the user interface), that each function of the software operates in conformance to the requirements specifications without any knowledge of the internal software logic and implementation (black-box).
In the following of this article, we will first design test cases and then will proceed with their automation. To automate functional UI tests on React applications, we will use, of course, Maveryx and, in this case, the Java language.
As you should know, Maveryx allows automating functional UI tests on web-based applications using Java-coded test scripts, or codeless tests, that execute test cases interactively in the same way a tester does it manually.
How to Design a Test Case
The first step is to design test cases that consist of a sequence of inputs and expected outputs for the React Application Under Test.
In particular, for this React calculator example, we will focus on the “division” operation.
Given two integers, X (dividend) and Y (divisor), we should consider the following cases:
| Nr. | X | Y | X/Y |
| 1 | > 0 | > 0 | > 0 |
| 2 | < 0 | > 0 | < 0 |
| 3 | > 0 | < 0 | < 0 |
| 4 | = 0 | ≠0 | 0 |
| 5 | = Y | = X | 1 |
| 6 | > 0 | = 0 | UNDEFINED |
For simplicity, let’s consider the first case:
| Nr. | X | Y | X/Y |
| 1 | > 0 | > 0 | > 0 |
At the higher level, the test case will result in the following steps:
- start the browser and navigate to the React calculator webpage;
- then enter X (dividend);
- and press the Divide button;
- again enter Y (divisor)
- and then press the Calculate button
- in the end, check the result (quotient): displayed vs. expected
In more detail:
| Step | Test input | Expected output |
| 1 | Start the browser and navigate to the React calculator page at https://ahfarmer.github.io/calculator/ | The React calculator page is opened at https://ahfarmer.github.io/calculator/ |
| 2 | Enter X (dividend) by pressing its digits (0…9) | X is entered on the display screen |
| 3 | Press the Divide (“÷”) button | |
| 4 | Enter Y (divisor) by pressing its digits (0…9) | Y is entered on the display screen |
| 5 | Press the Calculate (“=”) button | X÷Y is displayed |
Considering X = 100 and Y = 20:
| Step | Test input | Expected output |
| 1 | Start the browser and navigate to the React calculator page at https://ahfarmer.github.io/calculator/ | The React calculator page is opened at https://ahfarmer.github.io/calculator/ |
| 2 | Enter ‘100’ by pressing 1, 0, 0 | 100 is entered on the display screen |
| 3 | Press the Divide (“÷”) button | |
| 4 | Enter ’20’ by pressing 2, 0 | 20 is entered on the display screen |
| 5 | Press the Calculate (“=”) button | 5 (X/Y) is displayed |
In every test case, each action shall correspond to an expected response from the Application Under Test. Of course, during test execution, the predicted response shall be compared to the actual response: obviously, if they match, the test case passes; otherwise, the test case fails.
From Table 1, the following test cases can be derived:
| Nr. | X | Y | X/Y |
| 1 | 100 | 20 | 5 |
| 2 | -100 | 20 | -5 |
| 3 | 100 | -20 | -5 |
| 4 | 0 | 20 | 0 |
| 5 | 10 | 10 | 1 |
| 6 | 100 | 0 | UNDEFINED |
How to Automate React Applications UI Testing
The designed functional UI tests (e.g., Table 3) can be executed manually or automatically.
It must be remembered that manual testing is when a human tester performs test cases directly interacting with the application UI.
On the other hand, automated testing is when a tester uses an automation tool like Maveryx to execute the tests. Of course, these tools require the tester to write a test script that contains the actions and the actual test case data, both inputs and expected outputs. The test scripts can be coded in many popular programming languages such as Java and run directly in most modern web browsers like Chrome.
The designed tests can be divided into three blocks:
- Launch the browser and open the React application URL
- Enter test data and calculate the result
- Check expected result vs. actual result
1. Launch the browser and open the application URL
| Step | Test input | Expected output |
| 1 | Start the browser and navigate to the React calculator page at https://ahfarmer.github.io/calculator/ | The React calculator page is opened at https://ahfarmer.github.io/calculator/ |
First, to launch the Chrome browser and open the React calculator webpage, we will create an XML file like this:
                <?xml version="1.0" encoding="UTF-8"?>
                <AUT_DATA>
                      <EXECUTABLE_PATH></EXECUTABLE_PATH>
                      <APPLICATION_NAME>CHROME</APPLICATION_NAME>
                      <TOOLKIT>WEB</TOOLKIT>
                      <AUT_ARGUMENTS>https://ahfarmer.github.io/calculator/</AUT_ARGUMENTS>
                </AUT_DATA>
Where:
- APPLICATION_NAME defines the browser to use (CHROME)
- AUT_ARGUMENTS contains the React calculator website URL (https://ahfarmer.github.io/calculator/)
Now, in the java test script, you have:
                //the Chrome->React Calculator launch file path
                final String reactCalculator = System.getProperty("user.dir") + "\\data\\ReactCalculator.xml";

                //launch Chrome browser and navigate to React Calculator
                Bootstrap.startApplication(reactCalculator);
2. Enter test data and calculate the result
| Step | Test input | Expected output |
| 2 | Enter ‘100’ by pressing 1, 0, 0 | 100 is entered on the display screen |
| 3 | Press the Divide (“÷”) button | |
| 4 | Enter ’20’ by pressing 2, 0 | 20 is entered on the display screen |
| 5 | Press the Calculate (“=”) button | … |
At this point, let’s focus on this test action:
| Step | Test input | Expected output |
| 2 | Enter ‘100’ by pressing 1, 0, 0 | 100 is entered on the display screen |
Now, to interact with the user interface elements of the React calculator webpage, we have to:
- locate the React elements/components to use (in this case, buttons ① and ⓪)
- perform the requested test action (click)
So, to locate the UI objects to test with Maveryx, you can specify an “identifier” (name, id, caption, etc.) and, optionally, a “type” (e.g., button, text, label, etc.).
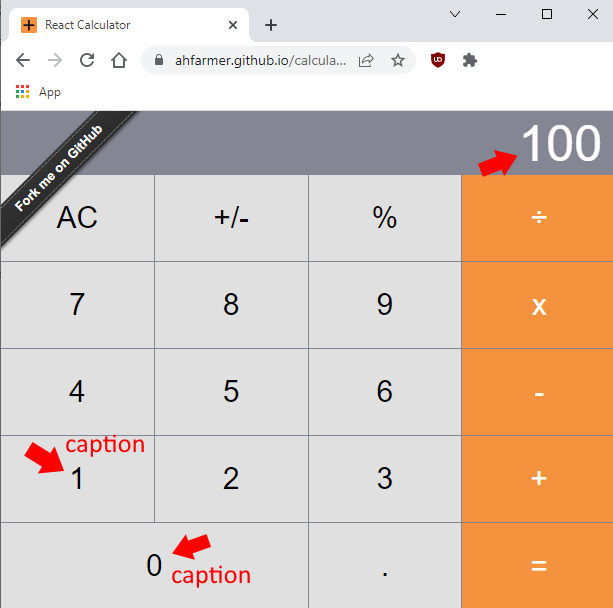
In this case, the buttons ① and ⓪ are identified by their caption (Figure 3):
                GuiButton one  = new GuiButton("1");
		GuiButton zero = new GuiButton("0");

		//100
		one.click();
		zero.click();
		zero.click();
Obviously, the same for the other React elements to test:
                GuiButton div 	= new GuiButton("÷");
		GuiButton two 	= new GuiButton("2");
		GuiButton zero 	= new GuiButton("0");
		GuiButton equal = new GuiButton("=");

		//÷
		div.click();

		//20
		two.click();
		zero.click();

		//=
		equal.click();
3. Check expected result vs. actual result
| Step | Test input | Expected output |
| 5 | Press the Calculate (“=”) button | 5 (X/Y) is displayed |
Now that the test has visited the React calculator page and interacted with it, it is time to verify that the expected output is displayed.
It must be remembered that assertions make verifying that the expected test results match the actual results easier. Indeed, if any assertion fails, the test will fail. Otherwise, if all assertions pass, the test will pass.
It must be remembered that one of the basic building blocks of Maveryx tests is JUnit assertions.
In particular, JUnit provides assertEquals() and assertNotEquals() methods to compare the equality and inequality of values. Of course, when they are equal, the assertion passes; otherwise, it fails by throwing an AssertionError.
The first parameter passed to the assertEquals() method corresponds to the expected value, and the second parameter is the actual value.
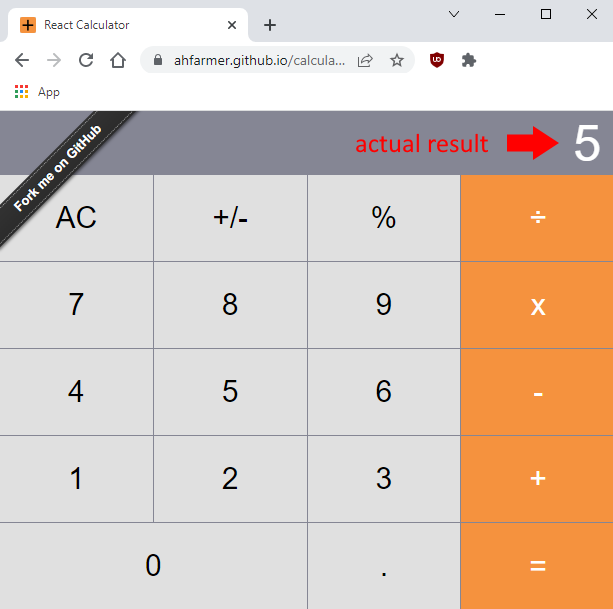
In our case, we would compare the estimated quotient with the actual quotient in the calculator display.
If X=100 and Y=20 -> the expected Quotient=100/20=5 (Figure 4)
                String expectedResult = "5"; // -> 100/20=5

                //the display element
		GuiHtmlElement display = new GuiHtmlElement("display");

                //compare the actual result in the display (display.getText) with the expected one
		assertEquals(expectedResult, display.getText());
By running the following test case, we found a bug in the case of
If X=100 Y=0 -> the expected Quotient=UNDEFINED
                GuiButton one 	= new GuiButton("1");
		GuiButton zero 	= new GuiButton("0");
		GuiButton div 	= new GuiButton("÷");
		GuiButton equal = new GuiButton("=");

		//100
		one.click();
		zero.click();
		zero.click();

		//÷
		div.click();

		//0
		zero.click();

		//=
		equal.click();

		String expectedResult = "UNDEFINED";
		GuiHtmlElement display = new GuiHtmlElement("display");
		assertEquals(expectedResult, display.getText());
Instead of returning ‘undefined’ (in ordinary arithmetic, the expression has no meaning), it returns 0 (Figure 4).

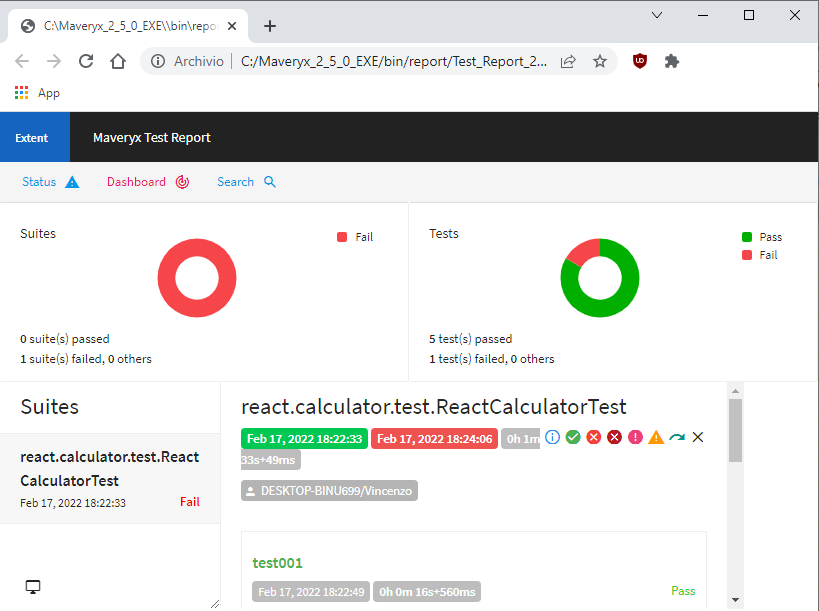
In the end, here is the test execution report (Figure 5):
Conclusion
To summarize, this article showed how to test a React application using Maveryx and Java.
React is an open-source, component-based front-end library responsible for the view layer of a web application. It is maintained by Facebook. Important to remember is that React uses a virtual DOM-based mechanism to fill data (updates) into a real DOM. The virtual DOM generally works fast because it only changes individual DOM elements instead of reloading the complete DOM every time.
Also, Maveryx is automated functional testing and regression testing tool. This software provides automated testing capabilities for functional, regression, GUI, codeless, and data-driven testing of desktop and web applications, of course, including React ones.
In conclusion, testing React applications with Maveryx and Java consists of three building blocks:
1) Launching a browser and opening the React app.
2) Identifying test objects and manipulating them.
3) Checking expected results vs. actual results.